Showing posts with label Digital Art. Show all posts

Monday, August 1, 2016

New Painting, Video Game Art

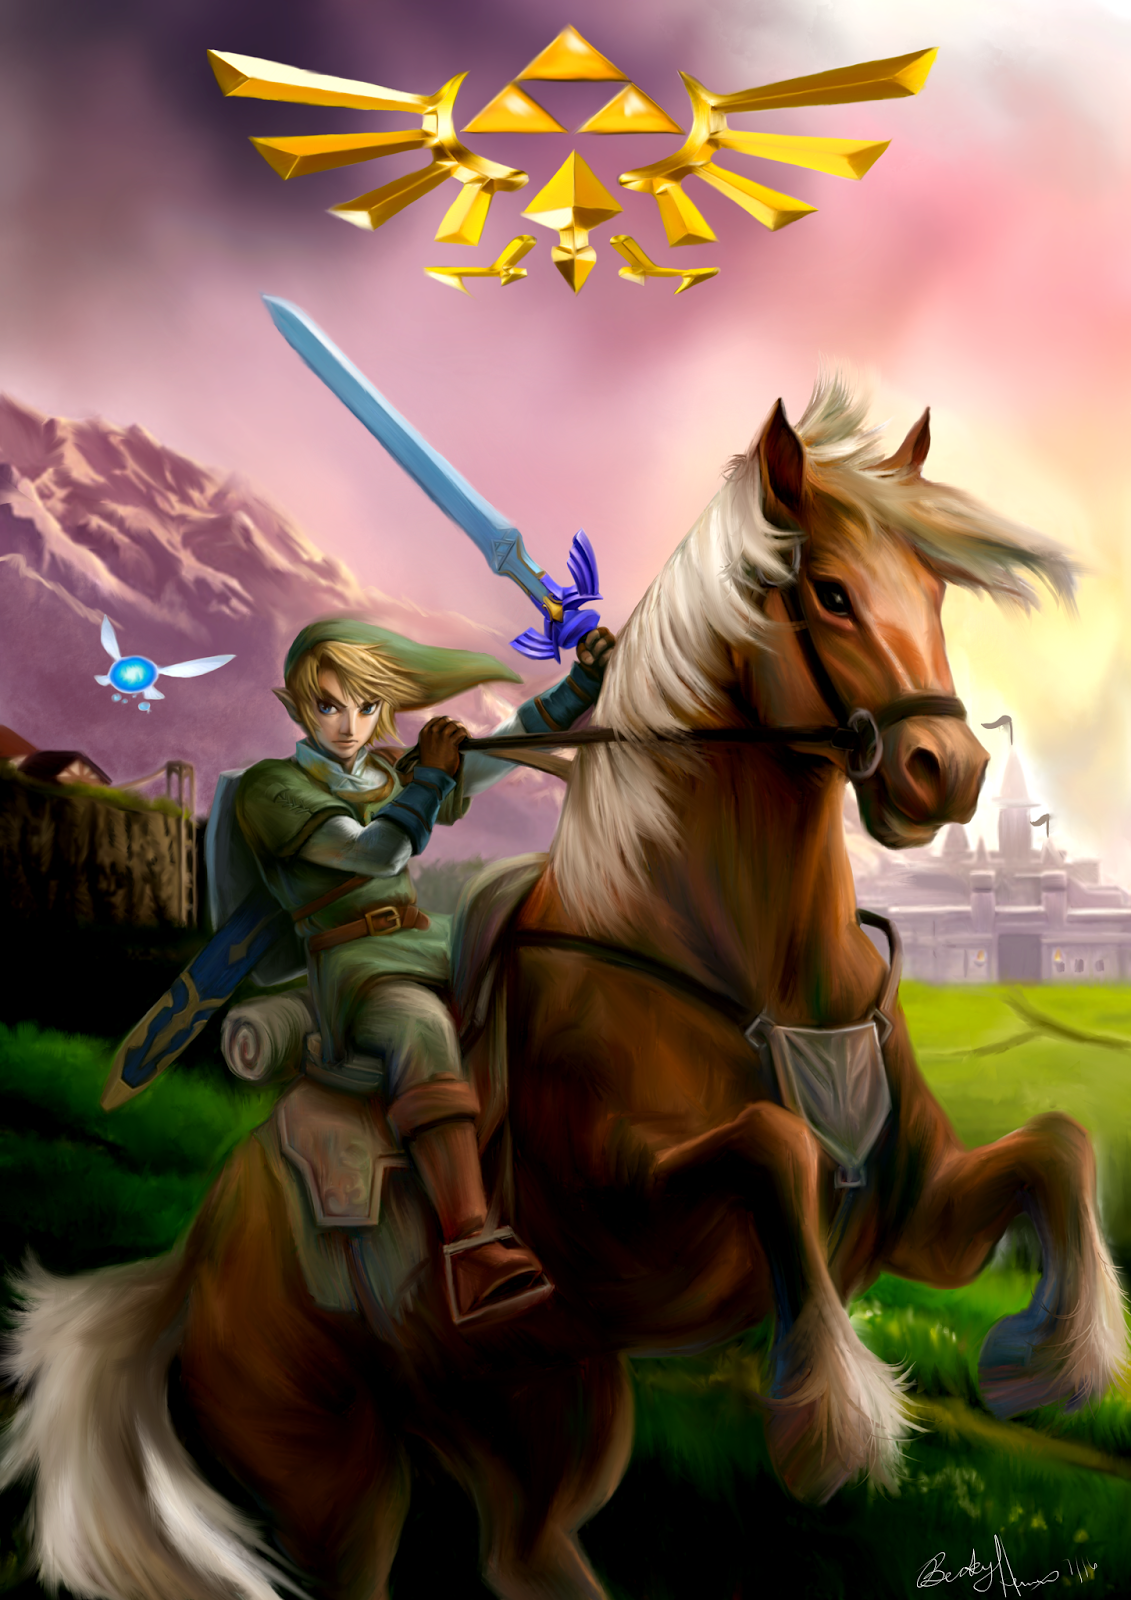
Legend of Zelda Fan Art


       Well I have been working on this painting for ages, but it is finally done and came out really well. This is a fan art painting of the Legend of Zelda, a video game from Nintendo. I don't normally do this type of art, but my husband is a huge fan of Legend of Zelda and so this painting was done as a birthday gift for him. It isn't my usual style, but it is good to expand and explore ideas. I did this painting on my iPad Air 2 using the app Procreate. 

Legend of Zelda, Link and Epona

Monday, July 25, 2016

My new favorite art style


Zentangle Inspired Art Wolf


The Zentangle Art Craze

     With the adult coloring book craze, there has been another craze coming about, zentangle doodles and zentangle inspired art. Zentangles are doodles done following different patterns. They are always done as squares and always black and white. Zentangle inspired art, is a little more lenient and you can use the zentangle patterns to create objects such as animals, flowers scenery and more.


Zentangle Patterns


     I have done two completed zentangle inspired art pieces so far, a wolf and an elephant. I also did them digitally. Traditionally, zentangles are done with pen or markers on cardstock or fine art paper. I am a digital artist, so naturally I would want to do these digitally.


     Well I did run into a few hiccups along the way, Since zentangle art is very detailed, zooming in to get those tiny details proved to be a problem, at least in most regular art apps. My go to app is Procreate. I love its versatility and intuitive design. It is a regualr art app however and zooming in to the level I wanted, produced some heavy pixelization. I went on the hunt and found out I needed a vector app to do away with the pixelization. Enter in the app, Concepts. Concepts is a wonderful vector and sketching app. I did my zentangle wolf almost entirely in Concepts. I did hit an issue however, I hit the memory cap on my iPad Air 2 and once that happened, Concepts became very unstable and crashed. I was almost done at that point, so imported my zentangle wolf back into Procreate to finish off the last few tangles and too add color which I am currently doing. This will be my workflow for now and I will try to reduce memory usage as much as I can to prevent the crashing.

    I love zentangle art and coloring in my creations are even more fun, you will probably see many more zentangle inspired art pieces from me in the future.

Thanks for looking!

--Becky Herrera
www.beckysdigitalart.com

Zentangle Inspired Art Elephant

Tuesday, June 7, 2016

What's New?

Latest Updates


     Well this blog post is a day late, but I have a lot of exciting things going on right now. I will be moving to a new home in a few weeks so blog updates will probably be sporadic until I get settled in the new place. I have had lots of commissions that have been keeping me busy which is awesome, but I have been a little slower working on my own projects. I should have some more time again once I am settled.

          So I have been working on my English Bulldog breed portrait. Here is the update. It looks like not much is done, but those eyes took forever because they are not shaped like normal eyes and all the folds make for a more complex subject. Overall, he is coming along nicely though will probably take a while to complete.


Next I am starting to Zentangle more. It is a perfect style for people that like to add intricate details like I do. Normally Zentangling or Zendoodles are done on paper with pen, I am of course trying it digitally, here is a peacock that I am starting to color but will take a long while to complete.

On that same note, here is a leopard gecko that I am starting to Tangle. I found a wonderful book at Joanns Fabrics the other day called Tangle Easy Wildlife Designs by Ben Kwok. It isn't another Adult Coloring book. It is a book to teach you how to make your own intricate design patterns like those found in adult coloring books. It comes with instructions, templates and inspirational examples. Best of all, these templates are copyright free and are able to be used to complete art to sell. I also became a part of the Facebook Group, Ornation Creation, which is a group created by the author and has many, many templates to choose from. I am very excited to try out this new art style and see where it takes me. 


 Tangle Easy Wildlife Designs


     Anyways, lots of new things to try and a new home to go to so I will definitely be busy the next few weeks. 


Thanks for looking!

--Becky Herrera

Monday, May 23, 2016

Eye Tutorial

Simple Eye Tutorial


     Today I am going to do a simple eye tutorial. If you do portraits, whether animal or people, the eyes are the most important part of the painting. I start all my portraits with the eyes. If I can get the eyes right, the rest of the portrait will usually fall into place.
   
     An important part of drawing or painting eyes is knowing the basic anatomy of the eye. This will go a long way to getting them to look realistic. The major parts are the pupil, which is the black part in the middle, the iris which is the colored portion of the eye and the sclera which is the white part of the eye. In animal portraits, most of the time the sclera won't be visible. Parts that are often forgotten in drawings and paintings, but help the eye look real are the catchlight or highlight. This is the reflective part of the eye and adding it will help make the eye look wet and round. There is also the eyelid shadow at the top part of the eye. This is the area of the eye that is usually darker because of the eyelids shadow on the eye. It is often forgotten in painting, but when added, makes a more realistic eye.
   
     Last part before the tutorial, make sure you know the specific eye anatomy of the animal that you are drawing. Many animals have different shaped pupils, but this isn't noticed by the artist and they may end of drawing an incorrect eye. A couple of examples are that cats have oval pupils, not round like people or dogs. I've seen horses drawn with round pupils countless times, but in reality they have rectangular pupils! Snakes have slit or oval pupils as well, so it pays to know the anatomy of the subject you are going to draw.

Now I am going to use my cat Katie, whom I used for the fur tutorial. so lets get started.


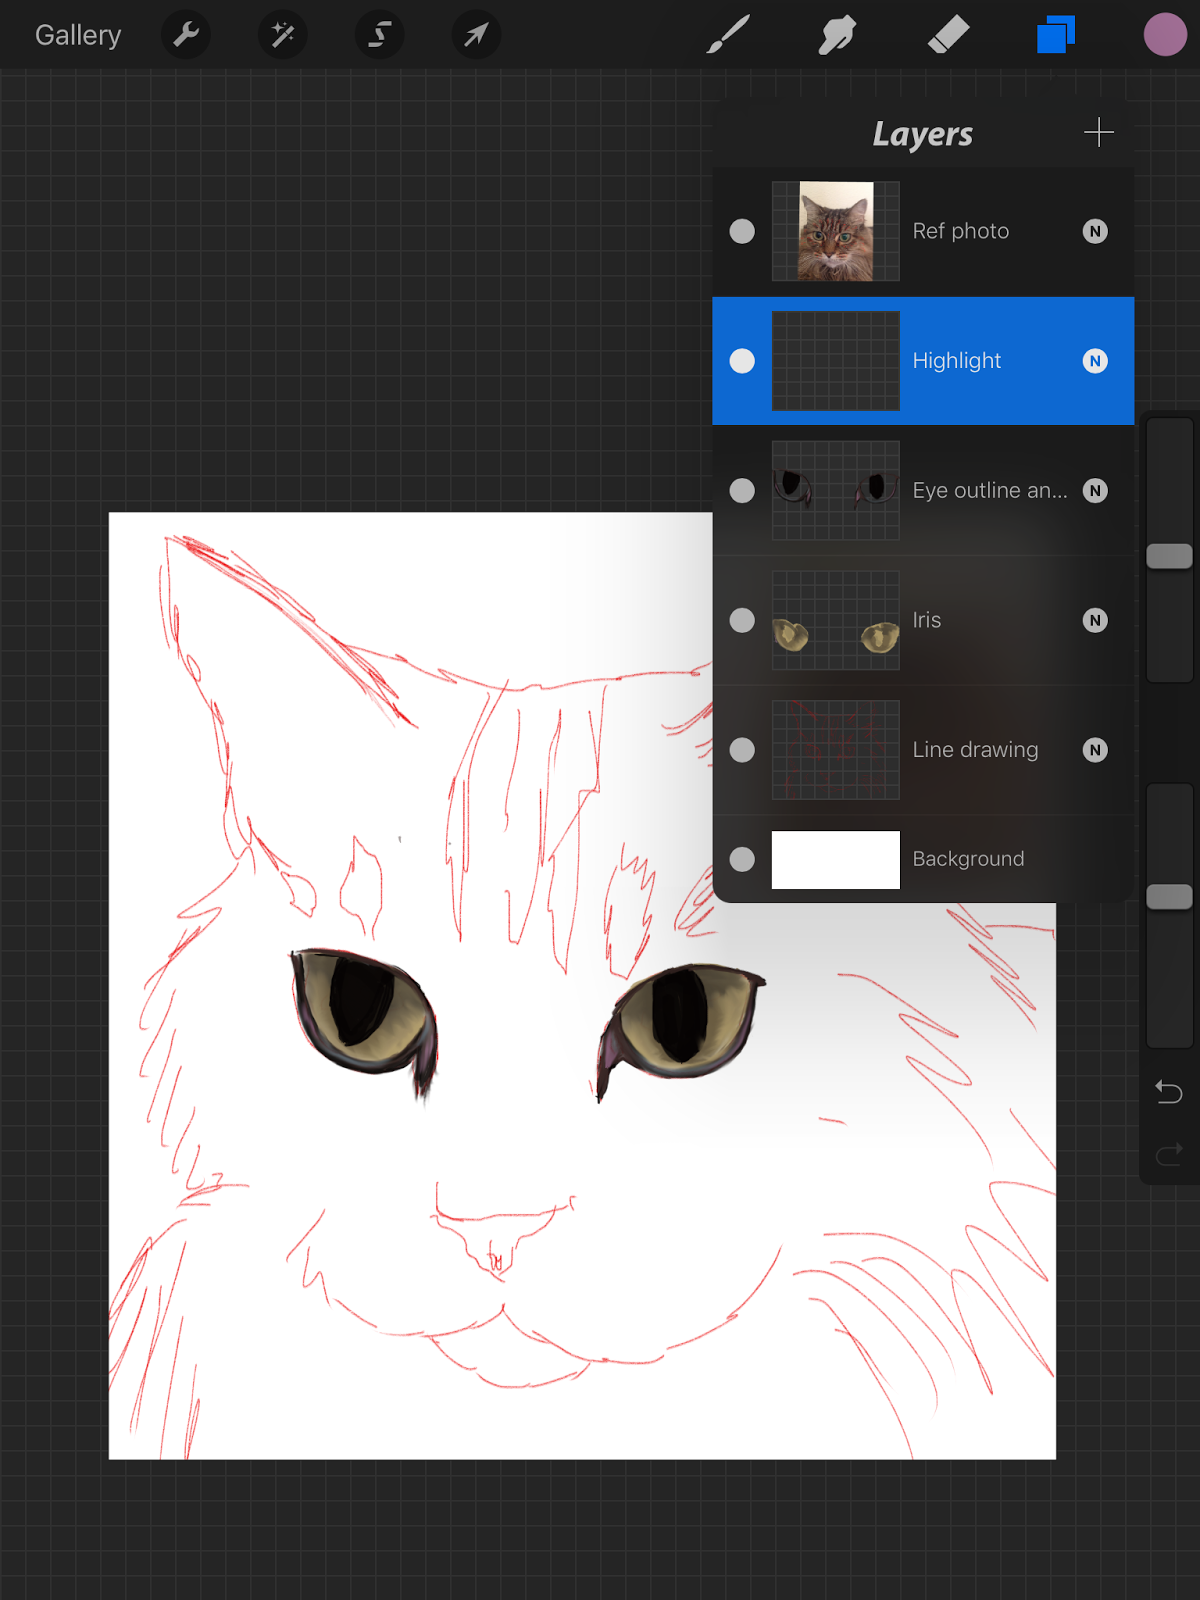
Step 1: I start with a line drawing on the bottom layer. On a new layer, I take a dark black color and color in the pupil and the eye rims. I have it at about 80% opacity so build up color layers til I get the depth I want. Since I am working in Procreate, I am using the Round Brush at about 50% size.


Here you can see the different layers. Layers are great as they keep the parts separate and the colors wont get muddy and blend into each other before you are ready to blend them.


Step 2: On a new layer below the pupil layer, I add a medium yellow green color for the iris color. I add it as an even flat color for now.


Step 3: Next, I add a darker yellow green color on the same iris layer. I radiate this color out from the pupil in a fan like pattern. We will blend these iris colors together in a future step.


Step 6: Here we blended the two colors together on the iris layer.


Step 7: I add a medium brown color to the eye rim on the pupil layer. This can also be done on a new layer if you want as well. If you do it on a new layer, place that layer below the pupil layer but above the iris layer.


Step 8: I add some peachy and pink colors to the eye rim and blend  together with the brown and black of the eye rim.


Step 10: Here we add the eyelid shadow on the iris layer.


Step 11: Here the eyelid shadow is blended in so there aren't any harsh lines. Sometimes I will add the eyelid shadow on a separate layer above the pupil and iris layers. Either way works.


Step 12: On the pupil layer I add a light blue color to the lower eye rim and blend in. This adds a shine and makes the eyelid look wet and gives more realism.


Step 13a: On a new layer above the pupil layer, I add our highlights. I usually pick a very light blue almost white color. I never use just white though as I think it looks too harsh.


Step 13b: Here is the highlights. They look white here, but in reality they are a very pale bluish white. It depends where to put the highlight, but I usually add two to each eye and have them half on the iris and half on the pupil. This isn't a set rule though.


Step 14: Blend the highlight so there are no harsh lines. You can use an airbrush blender or the round brush blender on 90% opacity.


Step 15: I add some extra blues and greens to the iris layer and blend these in. You can add lots of colors to give the iris more interest. Irises are never just green, blue or brown. There are usually lots of different colors in there to make each eye unique.


Step 16: I went back and added more color to the highlights. At the very end, I will merge the pupil, iris and highlight layers together and then blend. I feather out the pupil into the iris and blend the highlight into both so that it looks natural.


Step 17: This is before the merging of layers, but at this point I will merge the layers together and then blend to get everything blended together and looking natural.


     I hope you enjoyed this tutorial! It is very basic in how I approach eyes. I will spend a lot of time adding colors to the iris to add depth and interest and I will go back and forth a lot on this step.

I hope this helps anyone who is curious on how to draw eyes digitally!

Thursday, May 19, 2016

Weekly Promotion for 5/20/16!


Weekly Promotional Painting


Secretariat
     In honor of the Preakness Stakes this weekend, I am offering another of my horse racing portraits as a limited time promotion. This one is my Secretariat Portrait . This is being offered as a 24x36 inch gallery wrapped canvas for $100. Offer is limited to 5 prints or until Sunday, May 22, 2016 at midnight. Be sure to check back each week for the new promotional painting of the week!


Thanks for looking
--Becky Herrera

Thursday, May 12, 2016

May 13th Weekly Promotional Painting!

Weekly Promotional Painting


     Well it's that time again! Even though it is Friday the 13th, you could be lucky and snag a deal on this weeks promotional painting. I am offering my German Shepherd Breed Art Painting as a 24x36 inch gallery wrapped canvas for only $100! This offer is good until Sunday 5/15/16 or until 5 prints have sold! 

Be sure to check back next week to see what the promotion will be or hit subscribe to have any new updates delivered to your inbox.

Thanks for looking!


--Becky Herrera

Monday, May 9, 2016

Realistic Fur Tutorial


How To Paint Realistic Fur


     Today I am going to give a quick, basic tutorial on how I create realistic fur and hair. For this tutorial, I am using an iPad Air 2, a Wacom Bamboo Stylus, and the app Procreate. Procreate is a very versatile and intuitive app and is what I use 95% of the time to create my paintings.

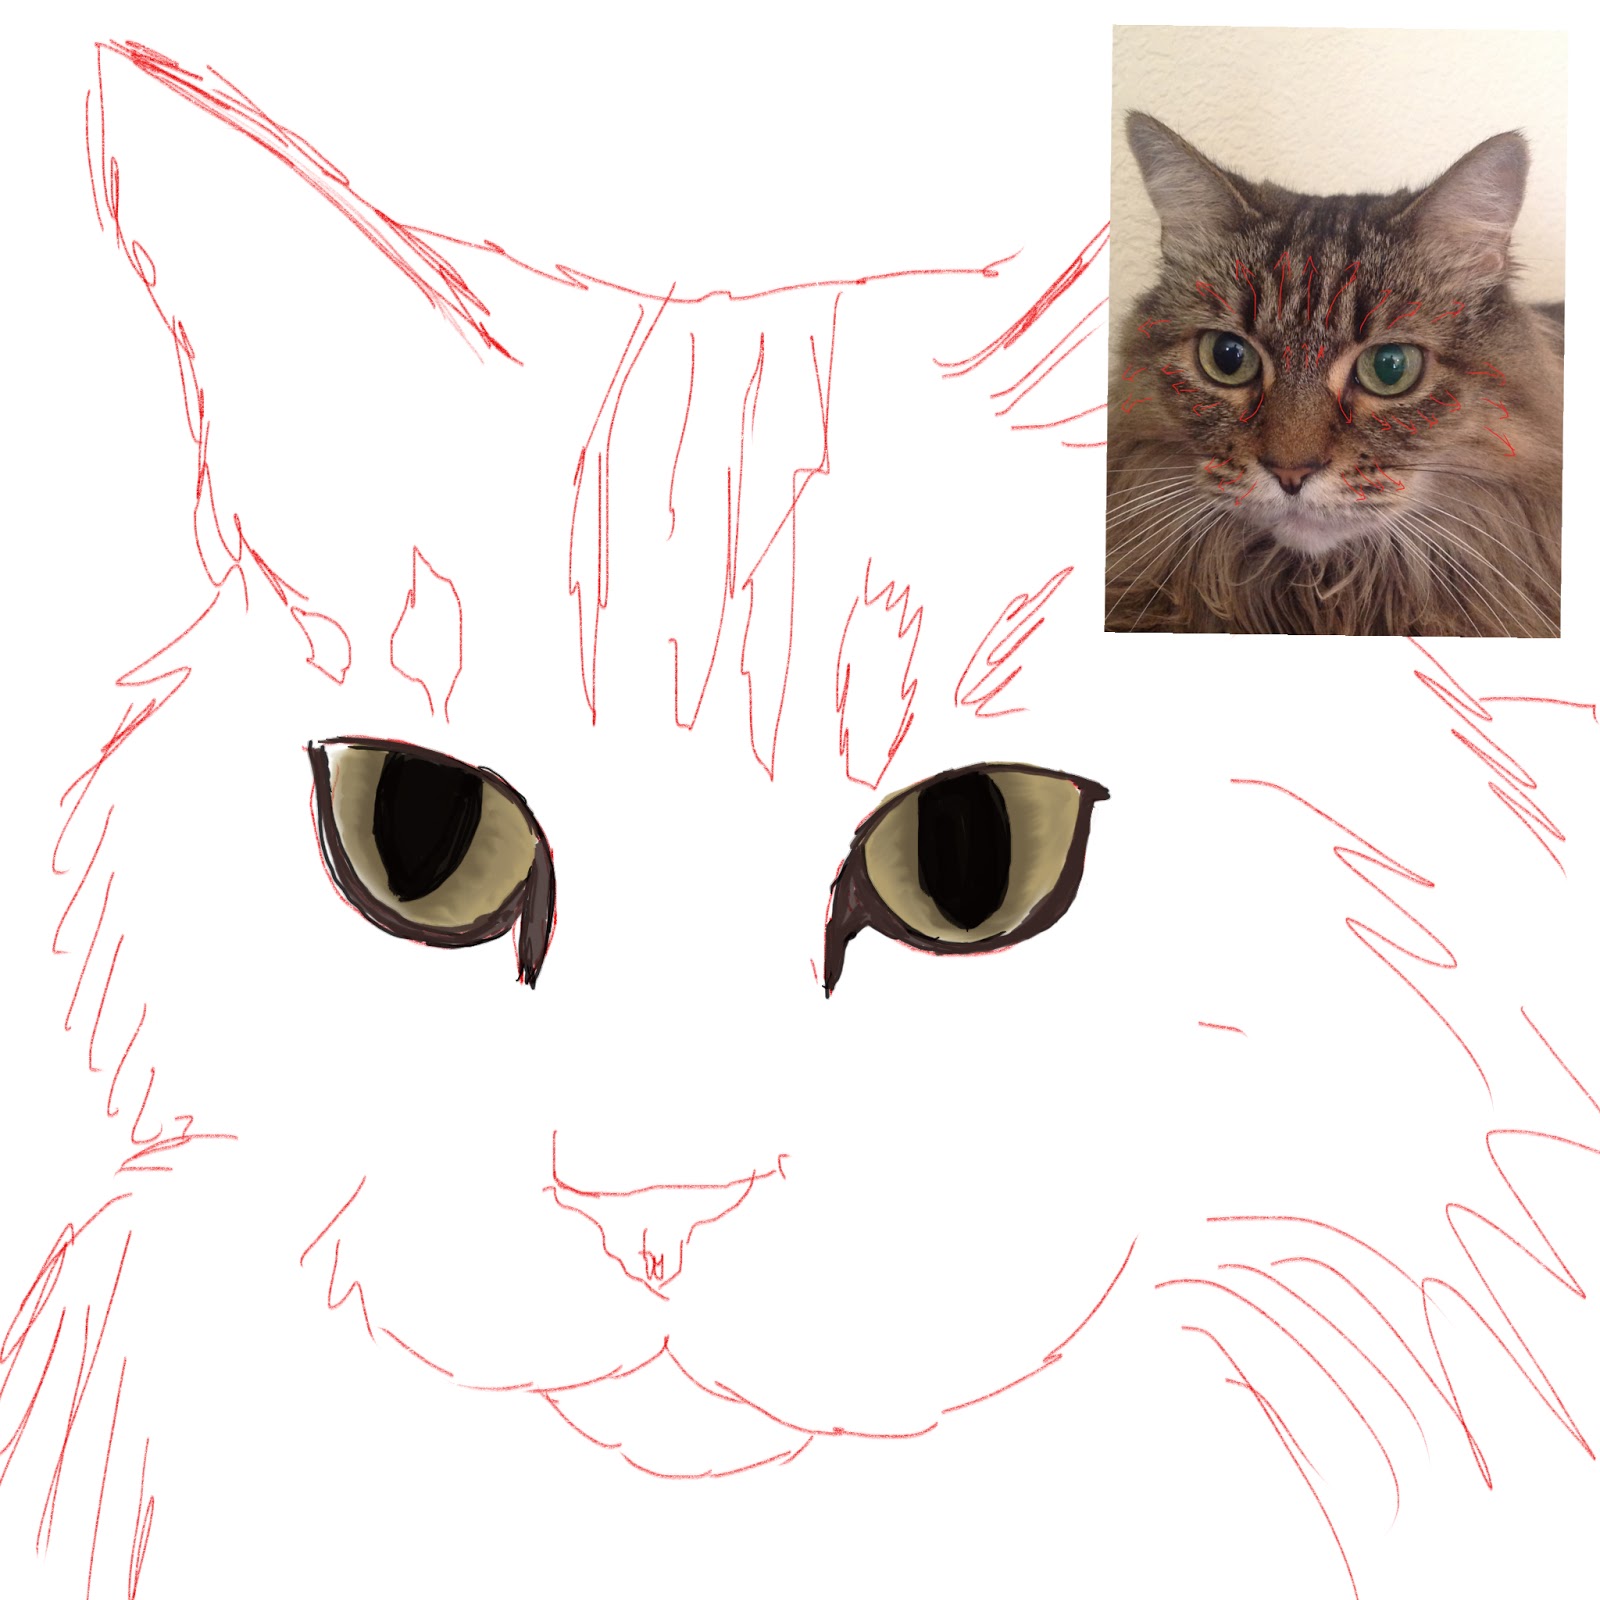
     The first step to realistic fur, is to figure out which way the fur grows on your subject. It is important to have your brushstrokes follow the same growth pattern of the fur. Most fur grows the same way, out from the nose and eyes in  a fan like pattern. In the photo below, of my cat, Katie, you can see the red arrows show the direction of her fur growth. This is the same direction your brushstrokes will go.

Fur direction is out from the nose and eyes

     Next I make a quick line drawing on the first layer. In digital art, you can use a wonderful tool called layers. This allows you to draw and paint without ruining a top or bottom layer. My line drawing is always on a separate layer and I actually delete it when I complete a painting. I also make a separate layer for my color palette. I like having my color palette easily accessible so having it on a separate layer works for me.


     Here is the
line drawing on the left and on the right I have my basic color palette as well as some blocking in of color.


     So in the above images, I have the basic line drawing. This is on the bottom layer and will be deleted when the painting is completed. On the right is my basic color palette, again on a separate layer. I picked a couple different tan colors for the base color as well as a darker brownish black that will be used as a shadow color and for the stripes.

     Normally when I paint, I start with the eyes and paint those until completion. If I can get the eyes right, the rest of the painting should come out ok. I didn't do the eyes here for this tutorial, but will do an eye tutorial in the future. I also work sections of the painting to almost completion. Each section is on a separate layer, and then merged down towards the end. In the above right picture, you can see I laid in some base tan color.

     For fur and hair I use a round brush at various sizes and opacities. In digital art, there are unique brushes called stamp brushes that can simulate hair and fur, but I've never found those very useful in giving a realistic look. They can actually look artificial. The round brush may take longer, and be more repetitive, but the results are worth it.


Here you see the round brush highlighted. It is the round brush that comes with the app, but I have modified it slightly to be more opaque and have more of a narrow tail at the end of the brush stroke. This helps it create fur more effectively.


In the image on the left, I added the slightly darker tan color and on the right I started smudging in the direction of fur
growth.


      So in the next steps above, I add the slightly darker tan color and add it in with a large round brush at 75% opacity.  On the left you can see that I have blended these colors together, all with the growth of the fur.

     Now on a separate layer, I'll start to create the stripes of the tabby coloring.


Here I added more of the lighter tan colors and then added the darker stripe color roughly where they need to go. I turn off the bottom layer, and then smudge out my stripe layer as seen on the right.


     On the left above, I continue to add some of the tan colors on a new layer. I also add in my stripes roughly where they are supposed to be. My brush is full opacity and almost full size. I then turn off my base layer with the tans and concentrate on the striped layer. I smudge out my stripes using the round brush as a smudge tool. I use it at 75% opacity and about half full size.


Here I continue to add more stripe and base color, going back and forth. I then smudge the colors together. At this point I take my round brush smudge tool and shrink it to about size 12 or 15, pretty small and opacity between 60 and 75 %. I now pull individual hairs, pulling light over dark and dark over light, to mix the stripes in with the rest of the fur.


     Here you can see close ups of the fur detail. I am pulling the stripes out into the lighter color. Each smudge creates the illusion of hairs. You can shrink your smudge brush even smaller and get even more detailed hairs. This takes a lot of time but I love the results. At this point, I've merged the stripe layer down into the base color layer and continue to smudge the layers creating my fur details.

     You may notice that the layers are still kind of thin and transparent. I remedy this by duplicating my paint layer as shown below. Duplicating layers builds up color quickly. I can then either merge these down or even use another layer trick by multiplying the top layer. Using layer blend modes such as multiply can have interesting effects. Multiply, tends to intensify the saturation of the color.


     To continue on a painting, I'll follow the same steps above working on different sections of the painting at a time. I'll work each section on a different layer and once they are close to done, I'll merge down to the base layer. 

     Working in sections like this rather than working on the whole painting at once, allows me to focus on the tiny details in that section. It is like working on a bunch of mini paintings that will create a larger painting when completed. 

     There are many ways to create fur, and this is just one way. In fact, a lot of digital artists will probably frown upon this way, because of my use of the smudge tool. A lot of digital artists are not fans of excessive smudge tool use. I personally don't care, and really like the results I get with this method compared to others I have used. Again it take practice. Don't be afraid to use layers, experiment on a separate layer so you don't ruin your painting. If you don't like how something came out, delete that layer. In fact, you can duplicate a whole painting, layers and all in Procreate, so you can save  the whole painting before going and trying something experimental. Digital art can be very forgiving in this way, and I've learned a lot just trying new things on different layers.

     I hope this tutorial helps. If anyone has questions or comments, feel free to leave them in the comments section below!


--Becky Herrera


Tuesday, May 3, 2016

My Art Studio


     While most artists have a dedicated art studio or at least a dedicated portion of a room devoted to their art, I don't. Another reason I love digital art. When I used to work traditionally, I used to take over the kitchen table with all my colored pencils. I had a whole closet dedicated to art supplies like pencils, papers and a portfolio to store completed works. Living in smaller apartments, and wanting to go even smaller, this storage and accumulation of art supplies is not appealing. In fact, I would go weeks without drawing or painting because I hated lugging the supplies out and putting them away when done.
   
     Well now my art studio is small and portable and can be set up and put away in less than 3 minutes. It only takes up one laptop bag to store everything I need. The ultimate in portability! Another major plus is I never run out of supplies which is huge when there are no art store nearby.

     So what do I use and where do I set up? I mostly set up at either the kitchen table or my computer desk, but the key is being able to put everything away so quickly so it is out of the way when I am done.

     My main device, and where most of the work occurs is my iPad Air 2. I got it last year in June so it is a little less than a year old. I really want a, iPad Pro, but will wait until I get a little more use out of this one. I have the iPad in a slim case so it fits nicely in my purse or laptop bag. This allows me to paint and draw anywhere.

     My main program that I use on my iPad is Procreate. I use it 95% of the time, even though I have several other art programs loaded as well. Procreate is very intuitive unlike Photoshop. It is also a steal at only $5.99. in the app store. I will do a more in depth review on it as well as other art programs in the future.
   
     As for styluses, I've tried many. I have settled for a "dumb" stylus over the bluetooth ones as I've never really liked any of those. The one I use is a Wacom Bamboo stylus. You can replace the nibs when they are worn and it is very solidly built. It has a great feel that I haven't found in any other stylus. It is $14.99 on Amazon. It also comes in different colors but I just have the basic black one. I also have a Sensu Brush, but I don't use it nearly as much as the bamboo stylus.

     Last but not least, I use a Macbook Air 13 inch laptop. I came from a huge 17 inch PC laptop that was really a desktop replacement and not very portable. This new laptop is great. It is small but still has a decent sized screen. Since it is a Mac it works more naturally with all my other idevices. I love the amazing battery life and it does everything I need it to. I use the Mac to do final color corrections to my paintings. I use a program called Photoscape that is $30.00 in the Mac app store. I also use it to show my reference photos so I can zoom in to the details when needed. I store all my completed paintings on the Mac and on an external drive. I recommend the 13 inch Macbook Air to the smaller 11 inch one because of the SD card slot that the 13 incher has. I use a jetbook lite SD card to expand the storage of my Macbook by an extra 256 gigs, which is awesome, especially in the more limited harddrive space of these smaller laptops. This macbook starts up blazingly quick due to the SSD drive. It starts up as fast as my iPad. This machine completes my art flow as I will upload my completed paintings to my various online stores, color correct as needed and add any final touches that may be necessary.

     All in all, this is my art studio. It works great, is extremely portable, and I never run out of supplies. I still have all my traditional art supplies stored in that closet, but maybe I will one day free up that space by getting rid of the supplies I no longer use.

     What are your digital art studio setups? Feel free to comment below!

--Becky Herrera
www.beckysdigitalart.com
www.pixelpaintcreations.blogspot.com

Thursday, April 28, 2016

New Weekly Promotional Painting for Sale!


Hawaiian Sunset
     I offer a weekly promotional painting every week on Fridays, This week is early because I won't be available, but normally it is Friday through Sunday. This is an awesome way to get a high quality gallery wrapped canvas print for a much more affordable price. Each of my paintings will be offered this way only once, so it is important to check back each week and subscribe to my blog so you'll be the first to know about these deals.

     Anyways, this weeks promotional painting is my Hawaiian Sunset painting. I decided to go large with this print as it would look great as a large canvas print for a living room or office. The size of this canvas print is 36x24 inches and it is offered at only $100! This is more than $120 off the regular price for this size! Offer is good for only 5 prints and only until Sunday at Midnight, which ever comes first, so be sure to check it out here http://fineartamerica.com/weeklypromotion.html?promotionid=193574.

This painting was painted digitally on an iPad using the app ProCreate. 

Note that any watermarks you may see on the images, do NOT appear on the final purchased print.

Thanks for looking!

--Becky Herrera

Tuesday, April 26, 2016

What To Do when Your Back Up Isn't A Backup?


     Well I had a little minor catastrophe yesterday. Since I’ve had issues with computers in the past and losing valuable data, I’ve learned one thing. Backup and do often and in several places. Don’t rely on one back up either. This I found to be true yesterday. 

     It all started with me actually wanting to do my weekly backup. Relying heavily on my iPad and computer, I back up regularly. I do a weekly backup of my iPad on iTunes  as well as have the iCloud backup feature turned on. Since iOS 9 though, iCloud backup isn’t reliable so I don’t hold too much comfort in it. Yesterday at the time of catastrophe, the last iCloud backup I had was 4/19/16. So my main back up method of my iPad, where my art is contained, is iTunes. Imagine my horror when I plug in to do my backup and I get several errors, a trigger on my antivirus and a message saying that my iPad couldn’t be backed up because of incompatible data. What?! I try again, same error. I try to restore from a previous backup from a week ago and here is the clincher. That backup was corrupted as were the last three before that. 

     Well after a little freak out session, I took my computer and iPad to my brother who does computer work for a living. He took a look. Apparently my iPad had a windows virus on it and was trying to infect my computer. Considering I have a Mac and not a PC it didn’t infect my computer but it did corrupt backups and prevented any new backups from being made. Because Apple loves keeping things a secret, it is very difficult accessing certain parts of the iPad, at least with out jailbreaking it. We tried restoring from the iCloud backup I did have. It restored, but with the stinking virus on it. 

     Now I was irritated but not too worried as I had backups of most important stuff, except one thing I neglected. This is where my heart dropped in my stomach. I hadn’t backed up the actual art work that I was working on in my art app, ProCreate. I had the png files but not the open layers files. My snow leopard painting that I’m almost finished with wast there. I had to save it! So with the restored but virus ladened iPad I exported the .procreate files for the 4 pieces I was working on. The .procreate files are like .psd aka photoshop files that keep layers intact. In fact you can export .psd files instead from ProCreate if you wanted to. I uploaded them to my iCloud Drive which is one of my many cloud backups. They were safe. The next thing my brother recommended was to wipe the iPad and start new. That means no restore from a previous back up. The thing I dreaded came to be. Reluctantly I made sure everything I wanted to keep was safe and we hit the nuke button. 

     I set up the iPad as new, and got my settings back in order. I then downloaded my most used apps aka ProCreate and a few others. I imported some of my photos and imported my brush settings and .procreate files back to ProCreate. YAY! They opened up and work. I didn’t lose any artwork!. I actually really didn’t lose anything this time around. I probably will find something gone eventually, but the stuff I need now is safe.

     What’s the lesson here. Don’t rely on one back up method and have several different backups of valuable documents.

Yay! She is saved!


So what is my back up methods?


     First, I have my full backups. I backup to iTunes once a week and try to back up to iCloud nightly. Sometimes that works, sometimes not, so I don’t rely on iCloud backup to heavily. I also will backup to iTunes if I have a major project that I progressed on so I don’t lose anything. The bad thing about these types of backups, like iTunes and Time Machine  is that they can fail and you can’t recover individual files from them if needed. It is an all or nothing approach. 

     To remedy this disadvantage, I make copies of valuable files in three different locations locally and 3 different locations that are cloud based. The things I back up are all my finished art files, my ebooks, photos, and music. They reside on an external hard drive, a flash or thumb drive, and an sd external storage drive. These are all kept in sync with a program called D sync. 

     I also have these same files in the cloud as well. I use my iCloud drive which is different than an iCloud backup. You can send individual files to iCloud Drive and pull them down as well. I also use dropbox for a few things like my Procreate brushes. I only have the free version of Dropbox so not a lot of storage. I also use a program called sugar sync which is ok and keeps certain folders on my computer in sync with the cloud. The final program I use is Crashplan. It makes a copy of files and folders I choose both locally on an external drive as well as in the cloud on their servers. 

     Some data specific backups that I use are Amazon for my ebooks iTunes Match for my music and iPhoto for my pictures, mind you I have local backups of all these files as well. 

     So you see, I might have backup overkill here, but after losing data in the past I’d rather be prepared than not. This is especially true now that my business relies on the data on my computer. and iPad.

     There are advantages of being a digital artist. Being able to change things on the fly, experimenting and not committing to a certain style eat. One disadvantage, is that our digital creations are just pixels until printed out, and they can easily be destroyed all with a simple computer crash.

     The general recommendation for backups is to have at least 2 local or onsite backups and one cloud based. I have more but then I am paranoid like that. One big tip for other digital artists out there, while you may be backing up your completed works, don’t forget to back up those in progress works complete with the layers. Backup the .psd files in photoshop or the .procreate files in Procreate. and don’t rely on one method for all your backup needs.


Hope this helps!


—Becky Herrera
www.beckysdigitalart.com

Friday, April 22, 2016

Weekly Promotional Painting


Friday Promotional Painting!

Horse Portrait Close Up


     Every Friday I offer one of my paintings as a limited time promotion.  The promotion is for an 11x14 inch gallery wrapped canvas for only $50! This is approximately 50% off the regular price which makes it such a great deal. Each painting is only offered once this way and is limited to only 5 prints. The sale ends on Sunday at midnight.

This weeks promotional painting is my "Horse Portrait Close Up." This is one of my earlier digital works but I still really like it. I was actually still using custom brushes back then and created one to create the fur texture of this bay colored horse. This painting was created on an iPad 4 using the apps Procreate and Sketchbook Pro. It would look great in a living room or office or maybe the tack room of a ranch. This would also make a great gift for any horse lover as well.


Thanks for looking and stay tuned for future sales and promotions!


--Becky Herrera

Thursday, April 21, 2016

What is Digital Art?


Digital Art


Work in Progress of Oscar
Painting of my cat Oscar
 So what is digital art really? According to wikipedia, Digital Art can be defined as any art that is made with the help of a computer. Drawings made on paper that are scanned in and changed in any way on the computer, photographs that are modified, 3D characters created using a computer are all examples of digital art. There are so many misunderstandings surrounding digital art, that in most circles, it isn’t even really taken seriously. This is a really sad situation. Most people think of photoshop filters when they think of digital art. They think of photo manipulation or that  someone puts a few photo color filters on and they are done. This isn’t true and even good photo manipulation can be an art form. There are many great artists on Fine Art America that use photo manipulation to a great end. They are usually photographers, but not always. 

     Then there is digital painting. Digital painting is basically painting using a stylus or mouse and creating the brush strokes on either a tablet or in the computer. There are even tablets to plug into the computer to make the painting process a little easier and more intuitive. Don’t get me wrong though, there is a learning curve when painting digitally, even when the artist may be an accomplished painter in traditional media.

Digital painting is an amazing art form and many effects can be achieved through it. Unlike in photo manipulation, digital painting starts out with a blank, digital canvas just as a traditional painter would. The digital artist builds up layers of color and digital paint to achieve the same thing any traditional painter would, a work of art. It may take less time to create, which is an argument of many traditional painters, but that is just because the digital painter doesn’t have any drying  or wait times. Most of my paintings take 10-15 hours to complete and sometimes more. I notice the better I get, the longer a painting takes. The following painting of "The Duel" took about 15 hours.


The Duel
 

 A digital artist and traditional artist are very similar. While an oil painter uses canvas and oil paints to make their art, a digital artist uses a digital canvas and pixels for paint to create theirs. Not one is better than the other, they are just different forms of art and each takes a unique set of knowledge and talent to achieve the end result, a work of art.

In closing, digital art is just the latest art form of the 21st century, it is stigmatized because it is new, just like watercolor was when it was new and colored pencils were 20 years ago. Even photography was stigmatized when the first cameras came out. 

Digital art is just art. The computer and the program are the tools, like brushes, pencils and paper,  but the artist is the one that uses those tools to create the masterpiece.

Example of fractal art


-Becky Herrera