How To Paint Realistic Fur
Today I am going to give a quick, basic tutorial on how I create realistic fur and hair. For this tutorial, I am using an iPad Air 2, a Wacom Bamboo Stylus, and the app Procreate. Procreate is a very versatile and intuitive app and is what I use 95% of the time to create my paintings.
The first step to realistic fur, is to figure out which way the fur grows on your subject. It is important to have your brushstrokes follow the same growth pattern of the fur. Most fur grows the same way, out from the nose and eyes in a fan like pattern. In the photo below, of my cat, Katie, you can see the red arrows show the direction of her fur growth. This is the same direction your brushstrokes will go.
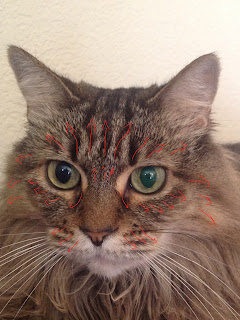 |
| Fur direction is out from the nose and eyes |
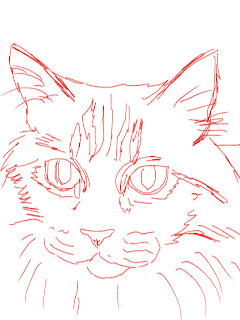
Next I make a quick line drawing on the first layer. In digital art, you can use a wonderful tool called layers. This allows you to draw and paint without ruining a top or bottom layer. My line drawing is always on a separate layer and I actually delete it when I complete a painting. I also make a separate layer for my color palette. I like having my color palette easily accessible so having it on a separate layer works for me.
 |
|

Here is the
line drawing on the left and on the right I have my basic color palette as well as some blocking in of color.
So in the above images, I have the basic line drawing. This is on the bottom layer and will be deleted when the painting is completed. On the right is my basic color palette, again on a separate layer. I picked a couple different tan colors for the base color as well as a darker brownish black that will be used as a shadow color and for the stripes.
Normally when I paint, I start with the eyes and paint those until completion. If I can get the eyes right, the rest of the painting should come out ok. I didn't do the eyes here for this tutorial, but will do an eye tutorial in the future. I also work sections of the painting to almost completion. Each section is on a separate layer, and then merged down towards the end. In the above right picture, you can see I laid in some base tan color.
For fur and hair I use a round brush at various sizes and opacities. In digital art, there are unique brushes called stamp brushes that can simulate hair and fur, but I've never found those very useful in giving a realistic look. They can actually look artificial. The round brush may take longer, and be more repetitive, but the results are worth it.
Here you see the round brush highlighted. It is the round brush that comes with the app, but I have modified it slightly to be more opaque and have more of a narrow tail at the end of the brush stroke. This helps it create fur more effectively.


In the image on the left, I added the slightly darker tan color and on the right I started smudging in the direction of fur
growth.
So in the next steps above, I add the slightly darker tan color and add it in with a large round brush at 75% opacity. On the left you can see that I have blended these colors together, all with the growth of the fur.
Now on a separate layer, I'll start to create the stripes of the tabby coloring.
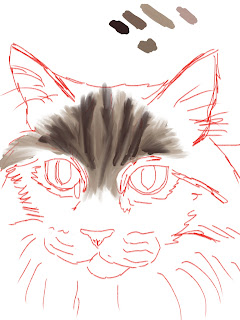
Here I added more of the lighter tan colors and then added the darker stripe color roughly where they need to go. I turn off the bottom layer, and then smudge out my stripe layer as seen on the right.
On the left above, I continue to add some of the tan colors on a new layer. I also add in my stripes roughly where they are supposed to be. My brush is full opacity and almost full size. I then turn off my base layer with the tans and concentrate on the striped layer. I smudge out my stripes using the round brush as a smudge tool. I use it at 75% opacity and about half full size.
Here I continue to add more stripe and base color, going back and forth. I then smudge the colors together. At this point I take my round brush smudge tool and shrink it to about size 12 or 15, pretty small and opacity between 60 and 75 %. I now pull individual hairs, pulling light over dark and dark over light, to mix the stripes in with the rest of the fur.

Here you can see close ups of the fur detail. I am pulling the stripes out into the lighter color. Each smudge creates the illusion of hairs. You can shrink your smudge brush even smaller and get even more detailed hairs. This takes a lot of time but I love the results. At this point, I've merged the stripe layer down into the base color layer and continue to smudge the layers creating my fur details.
You may notice that the layers are still kind of thin and transparent. I remedy this by duplicating my paint layer as shown below. Duplicating layers builds up color quickly. I can then either merge these down or even use another layer trick by multiplying the top layer. Using layer blend modes such as multiply can have interesting effects. Multiply, tends to intensify the saturation of the color.
To continue on a painting, I'll follow the same steps above working on different sections of the painting at a time. I'll work each section on a different layer and once they are close to done, I'll merge down to the base layer.
Working in sections like this rather than working on the whole painting at once, allows me to focus on the tiny details in that section. It is like working on a bunch of mini paintings that will create a larger painting when completed.
There are many ways to create fur, and this is just one way. In fact, a lot of digital artists will probably frown upon this way, because of my use of the smudge tool. A lot of digital artists are not fans of excessive smudge tool use. I personally don't care, and really like the results I get with this method compared to others I have used. Again it take practice. Don't be afraid to use layers, experiment on a separate layer so you don't ruin your painting. If you don't like how something came out, delete that layer. In fact, you can duplicate a whole painting, layers and all in Procreate, so you can save the whole painting before going and trying something experimental. Digital art can be very forgiving in this way, and I've learned a lot just trying new things on different layers.
I hope this tutorial helps. If anyone has questions or comments, feel free to leave them in the comments section below!
--Becky Herrera